Introduction
If you are like me then you may have heard of SMTP, IMAP, Mail Transfer Agents, Exchange servers, phishing, SPF/SKIM/DMARC but lack real understanding and at this point are too afraid to ask. I have read multiple blogs and tutorials over the years but the topics around “email servers” can be daunting and confusing. The goal of this blog is to build up our intuition/understanding by creating an email server from scratch in Python. We are not making a production-grade server, however we will make something that hopefully functions and emphasizes security. Along the way we will answer questions like:
- How exactly do attackers spoof the "From" field in an email?
- Can anyone send phishing emails from their computer?
- How do you pentest an email server?
- What happens when you "delete" an email in your inbox?
- This is a multi-part series: Receiving Emails, Reading Emails, Sending Emails.
- If you do not know Python, zero worries I’ll be showing diagrams and providing descriptions that should be illuminating even if you don’t understand the code.
- Our code will not strictly follow RFCs, we are just trying to get a basic server up and running. So do not try to deploy this in a production/internet facing environment.
- We are going to leave out some of the nuance and additional details at certain points on this journey. Rather than aiming for a near-perfect understanding, we'll focus on the key points and aim for a solid 60-80% grasp of the topic
Overview
In this blog we will cover: receiving emails, creating a SMTP server from scratch in Python, setting up your domain (TLS, SPF, DKIM, DMARC), and designing our architecture for storing emails.
Receiving Emails (Server-to-Server)
To receive emails from the internet you'll want a server listening on port 25 (SMTP). Your SMTP server needs 3 pieces of information for every email: MAIL FROM, RCPT TO, and DATA. Suppose you use Gmail and want to email your server. When you click send, Google's servers will send the following to your SMTP server:
MAIL FROM: <your-gmail>@gmail.com
RCPT TO: <your-username>@<your-domain.com>
DATA:
  Subject: Test Email
  From: <your-gmail>@gmail.com
  To: <your-username>@<your-domain.com>
  Content-Type: text/plain; charset="utf-8"
  Content-Transfer-Encoding: 7bit
  MIME-Version: 1.0

  This is a test email!
Notice that inside of DATA there are also From and To lines. We'll revisit this later, but for now just know that MAIL FROM and RCPT TO do not have to match From and To. Also, this is a heavily simplified example. We could have a full discussion just on everything inside of the DATA section.
SMTP Server — Python
Now we will implement this server in Python. The GitHub repo with all of this code can be found here: . Our server will use asyncio instead of threading. Here is the basic structure:
import asyncio

HOST = "0.0.0.0"  # listen on all IPs
PORT = 25  # SMTP=port 25
MAX_CONNECTIONS = 10  # num of connections server will accept concurrently
READ_TIMEOUT = 10  # num of seconds to wait before timing out connection

async def handle_client(reader, writer):
    # SERVER CODE HERE
    pass

async def main():
    server = await asyncio.start_server(
        handle_client,
        host=HOST,
        port=PORT,
        backlog=MAX_CONNECTIONS,
        )
    # run the server!
    async with server:
        await server.serve_forever()
# run the main() function using asyncio
asyncio.run(main())
This runs a TCP server listening on port 25, accepting up to 10 concurrent connections. Most of our work will live in that <SERVER CODE HERE> section.
Let’s start adding the SMTP specifics to our server. We’ll add functions send() and read_line() to both send and retrieve data. Additionally our server will send the 220 Server Ready which is the first step for SMTP.
import asyncio

HOST = "0.0.0.0"  # listen on all IPs
PORT = 25  # SMTP=port 25
MAX_CONNECTIONS = 10  # num of connections server will accept concurrently
READ_TIMEOUT = 10  # num of seconds to wait before timing out connection

async def handle_client(reader, writer):
    # get the ip address of who is connecting to our server
    client_addr = writer.get_extra_info("peername")  # ('1.2.3.4', 54321)

    async def send(line):  # Function to send data
        writer.write((line + "\r\n").encode())
        await writer.drain()

    async def read_line(reader):  # Function to read data
        try:
            data = await asyncio.wait_for(reader.readline(), timeout=READ_TIMEOUT)
            return data.decode().rstrip("\r\n")
        except:
            return None

    try:
        # SMTP greeting
        await send("220 Server Ready")

        mail_from = None
        rcpt_to = []
        data_mode = False
        message_lines = []
        message_size = 0
        authenticated = False
        # we'll use this while loop to keep retrieving SMTP commands
        while(1):
            # Read 1 line at a time (\r\n)
            line = await read_line(reader)
            if line is None:
                break
            # print out the command
            print("C:", line)
    finally:
        print("disconnected:", client_addr)
        writer.close()
        await writer.wait_closed()

async def main():
    server = await asyncio.start_server(
        handle_client,
        host=HOST,
        port=PORT,
        backlog=MAX_CONNECTIONS,
        )
    # run the server!
    async with server:
        await server.serve_forever()
# run the main() function using asyncio
asyncio.run(main())
You can run the code above for a bare minimum SMTP server! To test the server run this code which will attempt to send an email to your server using localhost.
import smtplib
from email.message import EmailMessage

msg = EmailMessage()
msg['Subject'] = 'Test Email'
msg['From'] = 'sender@example.com'
msg['To'] = ['testuser@test.com']
msg.set_content('This is a test email.')

with smtplib.SMTP('127.0.0.1', 25) as server:
    server.send_message(msg)
When you run this, your SMTP server should print an ehlo from the client, then disconnect after 10 seconds:
C: ehlo [192.168.152.1]
disconnected: ('127.0.0.1', 55916)
Congratulations, you now have a semi-functioning SMTP server! In our while(1) loop we need to continue adding SMTP support for the various commands that will come in MAIL FROM RCPT TO DATA. This will require enough code that it will make the blog barely readable. Additionally, we will need to add some syntax checks to the email addresses coming in since attackers have full control over these values.
Setting up your Domain (TLS, SPF, DKIM, DMARC)
To make our SMTP server more secure and reputable we'll want to enable TLS, SPF, DKIM, and DMARC. Here's a quick summary:
TLS
We enable TLS by supporting the STARTTLS SMTP command via Python's ssl library:
...
elif cmd == "STARTTLS":
    if tls_active:
        await send("454 TLS already active")
        continue

    await send("220 Ready to start TLS")

    ssl_ctx = ssl.create_default_context(ssl.Purpose.CLIENT_AUTH)
    ssl_ctx.load_cert_chain("server.crt", "server.key")

    loop = asyncio.get_running_loop()
    transport = writer.transport
    protocol = transport.get_protocol()

    new_transport = await loop.start_tls(
        transport, protocol, ssl_ctx, server_side=True
    )
    reader._transport = new_transport
    writer._transport = new_transport
    reader._over_ssl = True  # may not matter
    writer._over_ssl = True  # may not matter

    tls_active = writer.get_extra_info("ssl_object")
            ...
We’ll need a public & private key for this to work. Services like Let’s Encrypt are great free ways to get TLS certs. For this example you can just make a self-signed cert and move the files to your current working directory.
openssl genrsa -out server.key 2048
openssl req -new -key server.key -out server.csr
openssl x509 -req -days 365 -in server.csr -signkey server.key -out server.crt
SPF
For the Sender Policy Framework we’ll be adding a DNS TXT record that has the IP address that all of our email sending should come from. This way when we send emails to gmail/outlook/etc... their servers will check this record and make sure the IP address sending the email is one of ours.
v=spf1 ip4:<YOUR_SERVER_IP> include:your-domain.com -allDKIM
Generate a public/private key pair and publish the public key in DNS:
openssl genrsa -out private.key 2048
openssl rsa -in private.key -pubout -out public.key
Publish the public key as a DNS TXT record at default._domainkey.<your-domain>.com. When sending emails, sign the DATA section with your private key.
DMARC
For Domain-based Message Authentication Reporting and Conformance we’ll make a DNS TXT record for: _dmarc.<your-domain>.com which says something like the following:
v=DMARC1; p=reject; rua=mailto:dmarc@<your-domain>.com;
ruf=mailto:dmarc@<your-domain>.com; pct=100If SPF or DKIM ever fails when other servers are checking the emails we send then they’ll view this rule. The rule says to email the logs to dmarc@<your-domain>.com and p=reject the email. This may not be advised in enterprise scenarios because if there’s a bug in your SPF/DKIM setup then no one in your company will be able to send emails externally. Alternatively it can be set to p=quarantine or p=none.
If you are setting up a honeypot email server you do not have to obey SPF/DKIM. You can log every email regardless. The ones that violate SPF/DKIM are likely phishing and of interest.
Architecture for Storing Emails
How do we actually store these emails? Are we using databases, are we storing these as files, etc…? There isn’t one answer to these questions, it depends and there are trade offs. This section may be a lot but I think it’s worth discussing our full implementation because it really illuminates different attack paths based on these decisions.
For our server we will be storing all of the metadata in a DuckDB database, and the emails (DATA described above) in files on disk. The database (emails.db) will have 4 tables (emails, mailboxes, user_emails, users). This gets pretty confusing but hopefully the illustration below helps.
The primary key is email_id which is a random unique identifier. Email_id will link to the user_emails table. One last note, the rcpt_to field is a list and therefore means an email can be sent to multiple of our users. We have a one-to-many relationship here. A single row in the “emails” table can map to multiple rows in the “user_emails” table.
Misc / Pentest Notes
You may have noticed that we have not discussed authentication to this point. Authentication will come into play when we are sending/reading emails. We don’t want anyone in the world to use our server as a relay, or to read any email on our server. However, since we were just focused on receiving emails we have to accept these SMTP requests without any credentials since Google’s, Microsoft’s, etc… SMTP servers don’t have credentials they could use. They’re just sending us emails from their users. This does mean that if a SMTP server wants to accept mail from any external sender then they also have to allow this.
If you are performing a penetration test on a SMTP server you can read through our code for some ideas on what to test. Some of my thoughts are:
- Is TLS required? How strong are the supported cipher suites?
- Are there bugs in processing email addresses (MAIL FROM, RCPT TO)? Try unicode and special characters, watch for verbose errors or stack traces.
- How does the server handle invalid or unknown commands?
- Denial of Service: test with large payloads and hanging connections.
- Does the server do user-existence checks ("550 No such user here")? If not, check for rate limiting you may be able to enumerate valid addresses.
Introduction
In Part 1 we created a SMTP server from scratch in Python. That server stores email metadata in a DuckDB database and email DATA in files on disk. This blog will focus on how users actually read those emails. Email clients (Outlook, Thunderbird, etc…) connect to your email server to read emails. SMTP does not support reading operations. So we have to use a different protocol. Historically POP was used but we’ll focus on IMAP. Our server will therefore also need to become an IMAP server. We will use port 143 and require upgrading to TLS.
Internet Message Access Protocol (IMAP) is similar in some ways to SMTP. Each IMAP command consists of a “tag”, “command”, and “args”. The tag is just an identifier for that request. There are a few commands that our server will support (ex: LOGIN, CAPABILITY, STARTTLS, SELECT, UID). The arguments for each command are relatively intuitive.
<tag> <command> <args>

A001 LOGIN user pass
In order to read an email, an email client like Thunderbird would basically send the following IMAP commands.
40 STARTTLS
28 authenticate PLAIN
30 login "testuser1@127.0.0.1" "[REDACTED PASSWORD]"
46 select "INBOX"
47 UID fetch 1:* (FLAGS)
48 UID fetch 1 (UID RFC822.SIZE FLAGS BODY.PEEK[HEADER.FIELDS (From To Cc Bcc Subject Date Message-ID Priority X-Priority References Newsgroups In-Reply-To Content-Type Reply-To)])
49 logout
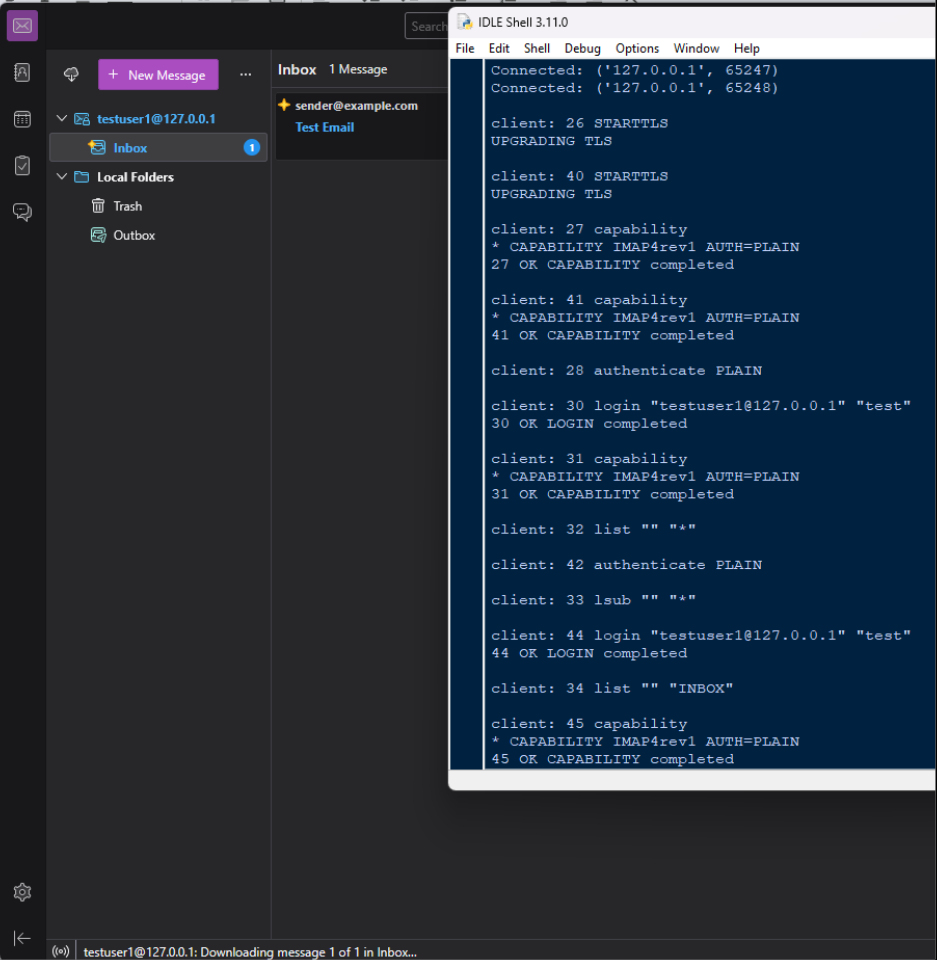
It begins by upgrading to TLS, logging in with an email and password. Selecting the “INBOX” mailbox and requesting all emails in it. For each email it’s requesting how long the email is and some details for the email (subject, from, to, etc…). Below is a screenshot of what the Thunderbird UI shows, and what our Python server prints out.
To create this IMAP server we will use the same structure as the SMTP server but listen on port 143. For each line we will parse the tag, command, and args.
tag, cmd, args = await parse_imap_command(line)
if(tag is None):
    await send("BAD invalid tag")
    continue
elif(cmd is None):
    await send(tag + " BAD Unknown command")
    continue
Authentication
The LOGIN command which accepts an email address and password in our case, will be handled by the following code. Observe that the password is hashed using MD5, then compared to the hash in our database for the provided email address. If they match then the login succeeds.
if(cmd == "LOGIN"):
    # example: A001 LOGIN user pass
    #print("LOGIN: ", args)

    try:
        # Check if creds are valid
        user_email = args.split(" ")[0].replace('"', "")
        user_password = args.split(" ")[1].replace('"', "")
        user_password_hashed = hashlib.md5()
        user_password_hashed.update(user_password.encode())
        user_password_hashed = user_password_hashed.hexdigest()
        conn = duckdb.connect("emails.db")
        conn.execute("""SELECT password_hash FROM users WHERE user_email = ?;""", [user_email])
        row = conn.fetchone()[0]
        if(row == user_password_hashed):
            print(tag + " OK LOGIN completed")
            await send(tag + " OK LOGIN completed")
        else:
            print(tag + " NO [AUTHENTICATIONFAILED] Invalid credentials")
            await send(tag + " NO [AUTHENTICATIONFAILED] Invalid credentials")

    except Exception as e:
        print(e)
        print(tag + " NO [AUTHENTICATIONFAILED] Invalid credentials")
        await send(tag + " NO [AUTHENTICATIONFAILED] Invalid credentials")
Other IMAP servers may support the AUTHENTICATION command which allows other types of auth such as OAUTH and Kerberos. To keep things simple our server will stick to plaintext passwords.
Selecting a Mailbox
What can get a little confusing is the SELECT and UID commands which are what actually allow email clients to read emails. The SELECT command chooses a mailbox for the user, and our IMAP server will return a bunch of metadata about that mailbox (how many emails exist, how many arrived since the client last checked, what’s the first email_id that hasn’t been read yet, etc…)
* 42 EXISTS        ← there are 42 emails in here
* 3 RECENT         ← 3 arrived since you last checked
* OK [UNSEEN 7]    ← email #7 is the first one you haven't read
* OK [UIDVALIDITY 1234567890]   ←
* OK [UIDNEXT 100]              ←
* FLAGS (...)      ← these are the flags this mailbox supports
* OK [PERMANENTFLAGS (...)]     ← which flags can be saved permanently
A001 OK [READ-WRITE] SELECT completed
This information is primarily stored in our user_emails and mailboxes tables. The mailboxes table is how we map the clients request for “INBOX” to a mailbox_id. We then use the user_emails table to lookup that mailbox_id and all the emails in that mailbox.
As shown in the code below, our SELECT command is really just a series of SQL queries to retrieve mailbox information and details about each email in that mailbox.
conn = duckdb.connect("emails.db")
conn.execute("""SELECT mailbox_id FROM mailboxes WHERE creator_email = ?;""", [user_email])
mailbox_id = conn.fetchone()[0]
conn.execute("""SELECT max(mailbox_sequence_number) FROM user_emails WHERE user_email = ?;""", [user_email])
mailbox_sequence_number = conn.fetchone()[0]
if(mailbox_sequence_number):
    mailbox_sequence_number = int(mailbox_sequence_number) + 1
else:
    mailbox_sequence_number = 1
conn.execute("""SELECT COUNT(*) FROM user_emails WHERE user_email = ?;""", [user_email])
count_emails = conn.fetchone()[0]
conn.execute("""SELECT COUNT(*) FROM user_emails WHERE user_email = ? AND flags = '';""", [user_email])
count_new_emails = conn.fetchone()[0]
conn.execute("""SELECT MIN(mailbox_sequence_number) FROM user_emails WHERE user_email = ? AND flags = '';""", [user_email])
new_email_id = conn.fetchone()[0]
Reading Email Contents
The last command to discuss is UID and is how email clients actually read email contents. The commands look like the following. Our server only supports UID fetch. The number after fetch is the mailbox_sequence_number which indicates where in the mailbox is this specific email. Is it the first/oldest, the last/newest, somewhere in between?
<tag> UID fetch 1:* (FLAGS)
<tag> UID fetch 1 (UID RFC822.SIZE FLAGS BODY.PEEK[HEADER.FIELDS (From To Cc Bcc Subject Date Message-ID Priority X-Priority References Newsgroups In-Reply-To Content-Type Reply-To)])
After the mailbox_sequence number is () which has varying content inside based on what information the email client is requesting. Our server parses each field in the parentheses and tries to pull it from our database if we can.
for arg in args_sanitized:
    arg = arg.replace("(","").replace(")","")

    if(arg == "RFC822.SIZE"):
        # total size of email
        response_str += "RFC822.SIZE " + str(len(email_contents)) + " "
    elif(arg == "FLAGS"):
        # current flags
        response_str += "FLAGS (" + str(email[5]) + ") "
    elif(arg == "BODY[]"):
        # entire email
        response_str += "BODY[] {" + str(len(email_contents)) + "} "
        body = True
    elif(arg == "BODY[TEXT]"):
        # just body, no headers
        response_str += "BODY[TEXT] {" + str(len(email_contents.split("\n\n")[1])) + "} "
        body_text = True
    elif(arg == "BODY[HEADER]"):
        # just headers, no body
        response_str += "BODY[HEADER] {" + str(len(email_contents.split("\n\n")[0])) + "} "
        body_header = True
    elif("BODY.PEEK[" in arg):
        # entire email
        response_str += "BODY[HEADER.FIELDS (Subject From To Content-Type Content-Transfer-Encoing MIME-Version)] {" + str(len(email_contents)) + "} "
        body = True
The full code for our IMAP server can be found here:
Misc — Flags & Deletion
One fundamental question is how do email clients know which emails are unread vs read? In our user_emails table there is a column called flags which is the answer to the previous question. There are a bunch of IMAP flags such as /Seen /Answered /Deleted /Recent /Draft, etc… The flags column is where we store this information and is how the email client knows how to show the email’s status in the UI.
To the question at the beginning of Part 1 ‘What happens when you “delete” an email in your inbox?’ the answer to that is the following:
1. User clicks delete on an email in the email client.
2. Email client sends a command to our IMAP server setting the /Deleted flag on that email.
It is then up to the email server to decide what to do. You could imagine that the server checks every email once a day and if it has the /Deleted flag set then it deletes it from the database. However, it can get complicated because if an email is sent to multiple employees it is stored once in the emails table, but will have multiple rows in the user_emails table. So although you could delete it for one user in the user_emails table, it will still exist for the other user. It would also still exist in the emails table.
Introduction
In Part 1 we created a SMTP server from scratch in Python, in Part 2 we developed an IMAP server to read emails. In this part we will discuss how emails are sent. Since simple Python scripts that send emails will likely be hijacked for malicious purposes, we will not create code for this section and will stay at a theoretical level.
Overview & Spoofing
SMTP is used to send emails. Previously we created a SMTP server that receives emails. Any computer is capable of sending emails to any SMTP server. The server will likely reject the email based on various criteria (SPF/DMARC for example). To quickly recap, SMTP consists of the following 3 fields.
MAIL FROM: @gmail.com
RCPT TO: <your-username>@<your-domain.com>
DATA:
    Subject: Test Email
    From: <your-gmail>@gmail.com
    To: <your-username>@<your-domain.com>
    Content-Type: text/plain; charset="utf-8"
    Content-Transfer-Encoding: 7bit
    MIME-Version: 1.0

    This is a test email!
The MAIL FROM and From fields do not have to match. From the email client perspective, the IMAP commands will just retrieve the From field and there’s no way for the email client to see the MAIL FROM. There are other email headers that may reveal it such as Return-Path however, these are exceptions. If SPF/DMARC are not set up correctly then any attacker can send emails to your SMTP server and spoof the From header which the email client will trust (Modern email clients do a bunch of additional checks themselves so this isn’t exactly accurate). Most email clients inspect the content of DATA for malware, phishing links, etc…
With respect to the DATA section of the SMTP request, there are a ton of supported headers that can be provided. Some of which are added by the sender, and others are added by the receiving email server. From a defensive perspective it is important to distinguish between these because receiving email servers can add a lot of noise (extra headers). When fingerprinting attackers it is often advantageous to extract just the DATA section sent by the attacker and use that as a signature to find other suspicious traffic.
When crafting a DATA section different content-types can be added to the email and nested (text, HTML, images, attachments, etc…). From an attacker’s perspective there are endless creative options that can be used to try and trick both email servers and email clients.
If a user sends an email in an email client (Outlook, Thunderbird, etc…) that causes the client to send a SMTP request to their email server. The email server then uses SMTP to send the email to the recipient’s email server. This first step is not actually necessary. Any computer can send a SMTP request to the recipient’s email server directly (you’ll likely be blocked as described above).
Final Thoughts
Hopefully this was useful information and the Python code helped illustrate some theoretical concepts in an easy to understand way. Thank you for your time reading this blog. All of the code for this blog can be found here: